Friday, March 29, 2019

Block countries in CentOS 7.6 with ipset blacklist and firewalld using ipdeny.com

I'm very new to firewalld in CentOS 7 but it does support ipset out of the box.  You use it differently than previous versions of CentOS with iptables though.
You can use the following site to get your country IP blocks: http://www.ipdeny.com/ipblocks/data/aggregated/  http://www.ipdeny.com/ipblocks/
You might check this out too for CentOS 6:  https://curtcorwin.blogspot.com/2019/03/block-countries-in-centos-6-with-ipset.html

1.  Build your ipset and make it permanent:
firewall-cmd --permanent --new-ipset=blacklist --type=hash:net

2.  Use the ipdeny.com site to get your country IP blocks.  The script below will automate this but will take a very long time to populate since there are quite a few blocks to import.
cd /root
nano RunIPSet

---------------copy---------------
#!/bin/bash
for IP in $(wget -O - http://www.ipdeny.com/ipblocks/data/aggregated/{cn-aggregated,ru-aggregated,kr-aggregated,pk-aggregated,tw-aggregated,sg-aggregated,hn-aggregated,hk-aggregated,ir-aggregated,ua-aggregated,vn-aggregated,it-aggregated,de-aggregated,my-aggregated,nl-aggregated,ng-aggregated,pk-aggregated}.zone)
do
firewall-cmd --permanent --ipset=blacklist --add-entry=$IP
done
---------------save---------------
Make it executable: chmod u+x RunIPSet
Run it:  ./RunIPSet

This could take a long time depending on how many countries you chose.  First you'll the files wget downloads and then you see "success" over and over for every block it imports into the ipset.

**EDIT***The above script took way too long*****Over 2 hours to complete*****
It's WAY faster to just download each country file locally and use the following command to import each of them into the ipset:
firewall-cmd --permanent --ipset=blacklist --add-entries-from-file=./cn.zone
firewall-cmd --permanent --ipset=blacklist --add-entries-from-file=./de.zone
firewall-cmd --permanent --ipset=blacklist --add-entries-from-file=./hk.zone
firewall-cmd --permanent --ipset=blacklist --add-entries-from-file=./hn.zone
firewall-cmd --permanent --ipset=blacklist --add-entries-from-file=./ie.zone
firewall-cmd --permanent --ipset=blacklist --add-entries-from-file=./il.zone
etc...

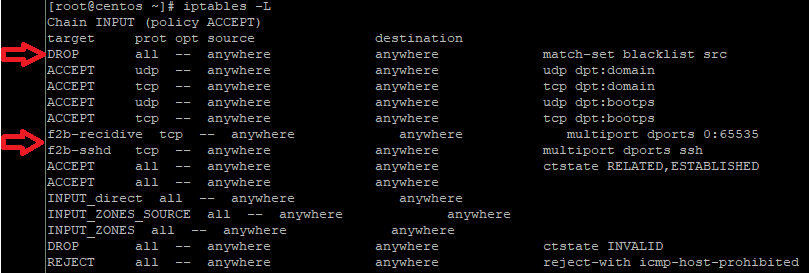
3.  Redirect the blacklist to the drop zone and reload:
firewall-cmd --permanent --zone=drop --add-source=ipset:blacklist
firewall-cmd --reload


More useful Commands:
Add ipset entry:  firewall-cmd --permanent --ipset=blacklist --add-entry=10.10.10/24
List ipset: firewall-cmd --permanent --get-ipsets
List entries in blacklist ipset: firewall-cmd --permanent --ipset=blacklist --get-entries
Remove firewalld entry: firewall-cmd --permanent --zone=drop --remove-source=ipset:blacklist
Delete ipset: firewall-cmd --permanent --delete-ipset=blacklist


Block countries in CentOS 6 with ipset blacklist and iptables using ipdeny.com

If your CentOS version doesn't come with ipset, install it with "yum install ipset". IPSET allows you to load a TON of IP addresses into a list using far less resources than it would be to load them into iptables. You only need one iptables rule then.  Below is how I set mine up.

1. Create an ipset that uses hash:net so we can block huge netblocks with CIDR notation.
ipset create blacklist hash:net

2. Then add the ip blocks you want to block to the blacklist ipset like below.  More on this in step 4 but I believe you've got to have at least one net block in there to add the iptables rule.
ipset add blacklist 1.0.1.0/24
You can get country IP blocks here: http://www.ipdeny.com/ipblocks/data/aggregated/ http://www.ipdeny.com/ipblocks/

3. Then add a rule in iptables to DROP the blacklist in the position of line 1. I put it first in line so it gets executed before all other rules.
iptables -I INPUT 1 -m set --match-set blacklist src -j DROP


As a test, I rebooted the server to see if the commands persisted, they did not. "iptables -L -n" showed my DROP rule in position 1 is gone, also "ipset list" showed no ipset's defined. This will mean that we need to execute a script at boot to load the /etc/sysconfig/ipset.blacklist into the ipset, and add the iptables rule last. I believe iptables will error out if you try to add the iptables rule first with no ipset called "blacklist" defined.

4. Fine tune/create your blacklist ipset and save it as a local file. This script will automatically add countries IP blocks to the "blacklist" ipset in memory. You still need to "ipset save blacklist > /etc/sysconfig/ipset.blacklist" after you get your ipset the way you want so you can load it at startup. I would recommend loading it from a local file instead of running the population script at boot time in case the ipdeny.com website is not available.
cd /root
nano RunIPSet


------------------Copy---------Credit for script is coming as soon as I find it again online-------------
#!/bin/bash
for IP in $(wget -O - http://www.ipdeny.com/ipblocks/data/aggregated/{cn-aggregated,ru-aggregated,kr-aggregated,pk-aggregated,tw-aggregated,sg-aggregated,hn-aggregated,hk-aggregated,ir-aggregated,ua-aggregated,vn-aggregated,it-aggregated,de-aggregated,my-aggregated,nl-aggregated,ng-aggregated,cf-aggregated,gt-aggregated,id-aggregated,ie-aggregated,il-aggregated,iq-aggregated,td-aggregated,za-aggregated,br-aggregated,ca-aggregated,dk-aggregated,fr-aggregated,in-aggregated,jp-aggregated,mx-aggregated,ph-aggregated}.zone)
do
sudo ipset add blacklist $IP
done
-------------------Save-------------------------------
This will take a long time to finish.  It will look like it's not doing anything. Just wait for 10 minutes or so.
Make it executable: chmod u+x RunIPSet
Run it:  ./RunIPSet  (This could take a long time, 10-20 min)
Verify your blacklist populated: ipset list blacklist | more
Save the ipset blacklist to the local file: ipset save blacklist > /etc/sysconfig/ipset.blacklist

5. Running the whole thing at startup. 
Save the iptables in memory to a file:  iptables-save > /etc/sysconfig/iptables.cdc
Run the commands below in order to 1.Restore the blacklist from file. 2.Restore the iptables rules from file.  I do this in CentOS6 by adding them to the end of /etc/rc.local
"nano /etc/rc.local" and add these commands to the bottom of the file.
ipset restore < /etc/sysconfig/ipset.blacklist
iptables-restore /etc/sysconfig/iptables.cdc

I'm noticing that the temporary fail2ban iptables entries that happen to be in "iptables -L -n" are saved when you run the iptables-save and thus restored when you run the iptables-restore command.  After waiting out the ban time, fail2ban will not remove these rules, I suppose because it didn't add them.  
Just "nano /etc/sysconfig/iptables.cdc" and delete the lines containing those IPs so it starts clean.

Notes and other useful commands:
If you have to modify the ipset in memory or the /etc/sysconfig/ipset.blacklist file, remove the iptables rule, destroy the ipset blacklist, create ipset blacklist again, and run the population script, save ipset memory to file, set the iptables rule again:
sudo iptables -L --line-numbers
sudo iptables -D INPUT 1
ipset destroy blacklist
ipset create blacklist hash:net
./RunIPSet  (This could take a long time)
ipset save blacklist > /etc/sysconfig/ipset.blacklist
iptables -I INPUT 1 -m set --match-set blacklist src -j DROP

Remove line from ipset blacklist: ipset del blacklist <ipaddress/xx>


Tuesday, January 14, 2014

Ever Ready 100T Shaving Brush Restore


This is my first shaving brush restore.  It's an old Ever Ready 100T and it wasn't too bad off as a handle but that old knot had to go.


Tied up the old knot and cut it out.


I used a drill and bit to expose the old knot base.


In case you're wondering a US penny is 18mm.
Dime = 16mm
Penny = 18mm
Nickel = 22mm
Quarter = 24mm


Used the drill to remove the old knot base and expose the hollow handle.


Sanding here with 220 grit paper.  If I had to do over again, I probably would have started with 400 grit.


A bit of work going from 220, to 600 wet sanding, 800 wet sanding, then 1000, then 1500, then 2000 grit.  After I was satisfied with the 2000, I used MAAS polish to shine it up.


These plastic beads came from a local plastic company where I was doing some work for my company.  Thanks Dan!  I used these beads to weight the handle down and fill the handle to where I could epoxy in a flat base for the new TGN knot to set down in.


Here is the epoxy knot "shelf" where the new knot will set down in.


Getting ready to "swipe" paint the letters gold.


I swabbed on the paint with a q-tip filling the letters and waited a bit, then did it again and let dry.  I sanded a bit and polished it up again with MAAS.


Here is the TGN 18mm finest badger knot set in epoxy on the epoxy shelf I built earlier.  It was a perfect restore with the epoxy coming right to the top of the handle as the new knot was set.


1931 Ever Ready Shaving Brush Restore


I found this Ever Ready shaving brush on Ebay and for some reason, I had to have it.  I liked the colors and knew it would be a good project.  Here it is when it came in the mail.  The old knot hair was dry and kind of nasty.  It almost looked like boar and not badger.


I used a drill and drilled out the old knot exposing the original knot cavity.  


A little MAAS polish shined it right up.


After using the Dremel for some time, I was able to expose the original lead weight ring.


I used some plastic beads and 5 dimes to weight the handle down.


Stacked 5 dimes up.


I then packed in as many plastic beads as I could around the coins and on top to make up the new knot base shelf.


Taped up for the epoxy.


Epoxied in the knot base shelf.


I used the Dremel to grind out the opening to fit the new 18mm knot and grind a flat spot in the epoxy shelf for the new TGN 18mm knot.  This also roughs up the epoxy shelf for the knot set epoxy to adhere to.


Set the new TGN 18mm knot in Finest Badger and the epoxy level came out perfectly, right to the top of the handle.  Here is the finished brush.